Pre-requisites
if you want to follow along with the exercises, you need the following:
- git (of course)
- A terminal of some sort, preferably bash or git bash
Some basic knowledge of git will help you on this course, but even if you have never heard of git, you'll still be able to take the course.
The Purpose of this Course
This course is intended for git beginners. We will go through some technical details on how git works under the hood, just so we don't get confused when we're working with git.
When I was a first year computer science student, I had a very tough time collaborating on school projects with git. This course is what I wish existed in that time.
Git
Git is a distributed version control system. Basically, it lets you save snapshots (commits) of your entire project at any time you want, which you can go back to and see what the project looked like at every snapshot.
Git also allows you to:
- Create 'branches' which are other versions of your project you can experiment on without touching the original
- Collaborate with multiple people at the same time without stepping on each other's toes, everyone creates their branch and works on it.
Some Key Terms
- repo: a project folder tracked by git (a folder with a .git folder in it)
- commit: a snapshot of a project in a point of time (not a diff)
- hash / SHA: every commit in git has a corresponding hash, which is a 40 character string calculated from a hash function that takes in the content of the commit. hashes act like the ID of a commit.
- index / staging area: An area that contains the tracked changes that have not been commited yet, think of it as a state between local changes and commited changes.
- working tree / work tree: The set of files that represent your project on your local machine
- local repository: the git repository on your local machine, which is the .git folder, this contains all your commits and branches on your local machine.
- The states of a file in git:
- untracked: git does not know this file
- ignored: git is explicitly told to keep this file untracked no matter what
- staged: git now knows about this file and will include it in the next commit
- committed: a file is in this state when it has been stored in a commit after being staged
- modified: git knows about this file but there is a change compared to the last commit
Some Key Facts
- Git is a Directed Acyclic Graph, the nodes are the commits and the edges are parent-child relationships between the commits
- Untracked files will be lost forever if they are deleted, they only exist in your file system
man git[-<operation>]to read the linux manual, if on windows, there is an online version
Config
You can configure git's behavior. Before we begin, we need to add our name and email in our git config so that it will add them to our commits. That way, we can know who made a certain commit.
You can set global (for all projects) and local (for a single project) configurations, local configs override global configs because they are more specific.
The git config is basically a set of key value pairs, all the keys follow this shape: <section>.<key>
To add a new key value pair, use: git config --add <section>.<key> <value>
To remove a pair: git config --unset <section>.<key> [<value>]
To see the value of a key: git config --get <section>.<key>
To see your entire configuration: git config [--global] --list
If the config contains duplicate keys it will always use the latest one.
EXERCISE:
- If you have not yet configured user.name and user.email do this now:
git config --global --add user.name <name>git config --global --add user.email <email>
- Make sure that init.defaultBranch is set to
main
Basics
Before diving in, we need to make sure that everyone's on the same page.
You can create a new repository for your project with git init, this will create a .git folder.
Your repository will have a default branch, the name of this branch is configured through the global key init.defaultBranch
The .git folder contains the entirety of the git repository, it stores all the commits, branches, and all the files in each commit. Git keeps all of this in compressed files, we'll take a look shortly.
If you want to remove a repository from a folder, simply delete the .git folder
EXERCISE:
- Create a repository on a path of your choosing
- Inspect the contents of the .git folder
Staging and Commits
This is 80% of the work you'll be doing in git (the other 20% will get you into trouble)
git add <pattern>adds files to the staging area (index)git commit -m '<message>'commits the changes that are in the staging areagit statusdescribes the state of your git repo
EXERCISE:
- Create a file and call it
first.md - Check the status of the repo
- Add first.txt to staging area
- Check the status of the repo, again
- Commit with a message
- Check the status of the repo, again
A useful tool to see the history of your repo is git log. This lets you see all the commits of your repository
EXERCISE:
- Run
git logand take a look at the output
Git Objects and SHA Hashes
Internally, git represents the state of the repository using objects, of which there are 3 main types: trees, blobs and commits:
- Trees are directories
- Blobs are files
- Commits are snapshots
So in each commit, there is the root tree, which is the representation of your project folder, this tree may contain other trees (subfolders) and blobs (files).
Note: in git, trees need to have at least one blob inside, this is why you cannot commit empty folders
Each object comes with a SHA1 hash, which is a 40 character (0-9a-f) string. The hash is calculated based on the contents of the object, the time it was created, the user who created it...etc
In git, by default, commands that need a hash, will only need the first 7 characters of the hash to locate the corresponding object.
EXERCISE:
- Find the SHA of your first commit
- Why is it different than mine?
- Find the SHA of your first commit in the .git folder
- Try to cat it out, what do you see?
git cat-file
You can use git cat-file -p <Object SHA> to see the content of the corresponding object file.
EXERCISE:
find the contents of first.md with git cat-file
Now, we'll prove that commits contain the state of the entire project and not just the changes from the last commit
EXERCISE:
- Create a new file second.md with some content and commit it
- cat-file the new commit and compare it with the old commit
- Can you get to first.md from here? Notice anything about the SHA of first.md?
- What can you say about the relationship between commits and blobs in git?
Hopefully, explaining how git works under the hood will make it feel less magical. Any program is just a piece of code, written with if statements, loops and variables. Even git.
Note: you can probably create some kind of parser that takes these strings from cat-file and build the repo yourself (that's exactly what git does)
Branch, Merge & Rebase
In team projects, it is kind of stupid to develop everything on a single main branch, that is asking for conflicts. Almost always, you want to create a branch for every feature, so that you can return to the main line and branch off to perform some immediate fix.
Branches
A git branch is cheap in memory and compute time, it is virtually free because internally, it's just a reference to the last commit on the branch.
- You can create a branch with
git branch <branchname> - You can switch to a branch with
git checkout <branchname> - Get a list of your branches with
git branch - You can delete a branch with
git branch -d <branchname>
[!IMPORTANT] if you want to follow along, don't change the content or the commit messages in the exercises.
EXERCISE:
- Create a new folder and initialize a new git repository
- Create a file
README.mdwith one line: 'A' - Commit with the message 'A'.
- Create a branch with the name
fooWeirdly, creating a branch will not change your current branch, you are probably still on main. - Switch to the
foobranch - Display a list of branches
- See what has changed in the git logs:
git log
Creating a branch will start that branch from the current commit you were on
EXERCISE:
- Find your branch details in the .git folder
- What are your remarks?
A branch in git is just a reference to the last commit in that branch, that's why they are so cheap.
Note: git checkout -b <branch> will also create the <branch> if it doesn't exist.
EXERCISE:
- In the new branch, create a new file SECOND.md with contents 'B'
- Commit with a message 'B'
- Now append 'C' to the end of SECOND.md
- Commit with a message 'C'
- Now take a look at the git logs
What is a history?
Merge
EXERCISE:
Before actually merging, lets create some new commits on our main branch, that way they diverge (having a number of unique commits between them).
- Checkout back to the main branch
- append 'D' to the README.md file
- commit with message 'D'
- append 'E' to the README.md file
- commit with message 'E'
- Check the git log
Now, we are ready to merge.
[!NOTE] Remember that a commit is the state of the entire code base in a point of time.
We have work done in our other branch but we need to get it back to our main branch, how?
A merge is attempting to combine two histories together that may have diverged at some point in the past, there is a common point between the two, called the best common ancestor, or merge base
if the best common ancestor is the tip of one of the branches, git will do a fast-forward merge, basically just changing the reference of the "old" branch to the "new" branch
Once the best common ancestor is found, git will try to merge the differences between the commits of the two branches, and then automatically commits all the changes combined into a merge commit which has two parents
To merge <branchname> onto the branch <target>:
- make sure you are switched to the
<target>branch - use this command:
git merge <branchname>
EXERCISE:
- Create a new branch off of the main branch, call it:
main-merge-foo - Now merge
fooontotrunk - Why does it ask for a commit message?
- Now use
git log --oneline --graph --parentsto see the results - What can you remark?
EXERCISE:
- Create a new branch off of the main branch, call it
bar - switch to
bar - add two commits with message 'X' and 'Y', please append the contents to a file called
bar.md - run
git log - Can you tell me what is different between this setup and the other one with
fooand the main branch (they both diverge) - Now merge
baronto the main branch, see what happens - Can you remark anything different about this merge?
Rebase
Rebase is sort of hard to get right, partly because people don't know why or when to use it; and using it wrong can cause a massive headache. In the end, rebase is just another tool to manipulate your repository effectively.
So, what does rebase do?
Rebase allows us to update underneath our set of changes, which is great for long lived feature branches (you can just merge, but it messes up your history with merge commits)
Instead of merging the changes of a branch into another branch by taking the changes and commiting them, rebase will basically "replay" the commits of the current branch that happened after their best common ancestor onto the target branch's tip...
We'll rebase foo with git rebase main so it looks like this:
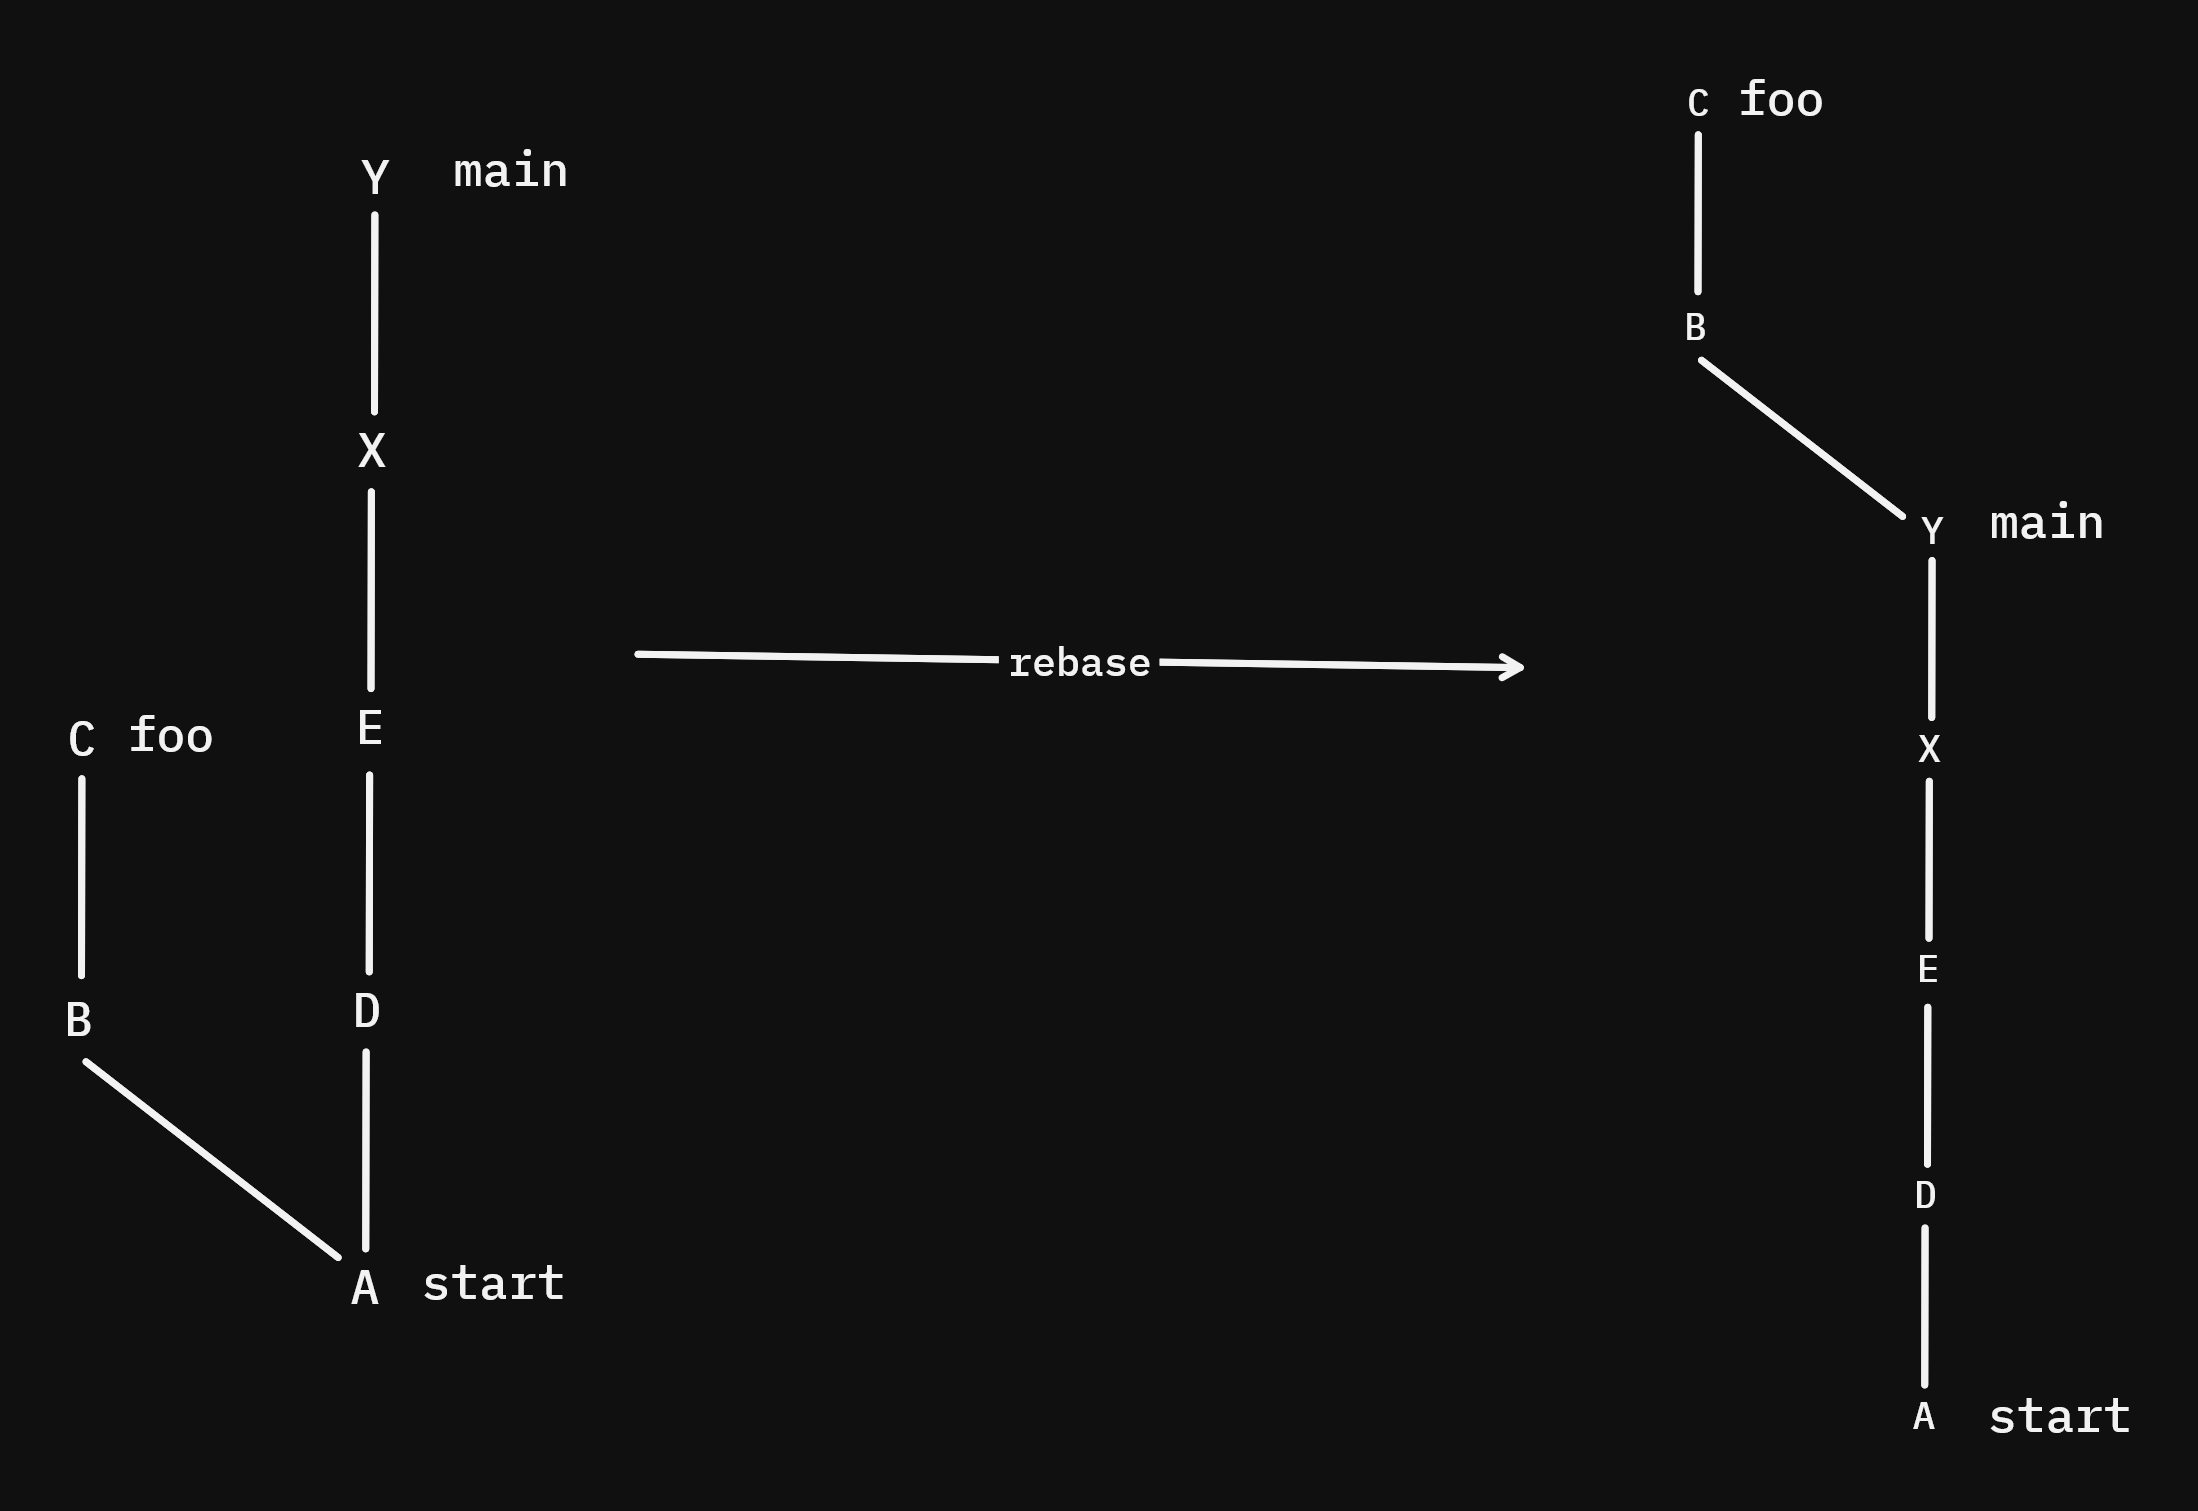
[!NOTE] NEVER REWRITE THE HISTORY OF A PUBLIC BRANCH!!! Rebasing rewrites history, so if someone has based his work on the old history, you will cause them significant problems.
EXERCISE:
- Create a new branch
foo-rebase-main - Rebase it onto
main(git rebase main) - Check the git log, what do you see?
- What can you say about the histories of the two branches? What would happen if we then merged
mainwithfoo-rebase-main?
HEAD, reflog & cherry-pick
HEAD
EXERCISE:
- Checkout to
main - Check the git log
- Checkout to
foo - Check the git log
- Try to find HEAD in the .git folder
HEAD is a reference to the branch you are currently switched onto. It is how git can know what branch you are on, it can then know the tip of the current branch, and then walk backwards to construct the git log graph.
Reflog
The reflog is a log that keeps track of where you move and the changes made to the tip of any branch. So any action like checkout, merge, commit will get recorded in the reflog
EXERCISE
- Can you find where the reflogs are stored in the .git reflog?
- what does
git reflogdo exactly?
EXERCISE
- Create a new branch from
main, call itbaz - Add one commit in
bazon a new filebaz.md - Switch back to
main - Delete the
bazbranch (git branch -D baz) - Now try to find the commit that just got lost (knowing that deleting a branch does not delete the commit...)*
- Okay, now find the contents of
baz.md - Great Job, you recovered
baz.md, what if we wanted to do that without any internals? Remember that a branch is just a pointer to a commit. - What is the scenario where you wouldn't use the command you just used?
Cherry Pick
Cherry picking is taking a single commit from another branch and applying its changes (the difference between that commit and the one before it) to your current branch. This is fantastic if you want to copy a specific feature / utility / change without merging the entire branch
EXERCISE:
if you didn't merge the baz commit onto main, try cherry picking: git cherry-pick <SHA>
Remote Repositories
Remotes
The biggest feature of git is sharing changes between developers, so how do we get their changes into our own repo? or how do we push ours to theirs?
It doesn't have to be remote...
Often, we think of remote repos as github or gitlab but it doesn't have to be that way.
A remote repository is simply a copy of the local repo somewhere else, basically.
- To add a remote use:
git remote add <name> <uri> - Check the remotes using
git remote -v
EXERCISE:
- Create a new repo
remote-gitsomewhere on your machine - Initialize the repo with
git init - Add your first repo as a remote to
remote-git, name the remoteorigin(git remote add origin </path/to/first/repo>) - Now check your remotes...
Naming conventions: usually if you only have one repo you'd call it origin, but if your work necessitates you using a fork (more on this later); you'd typically have your fork called origin to push to the actual project repo, usually called upstream.
Fetch
Now we would love it if we could merge the changes from our first repo into remote-git. Wouldn't it be great if we could copy all the objects(commits, trees, blobs) from the first repo and rebuild?
git fetch will fetch all the objects and state from our remote repository, but will not update the current branches
EXERCISE
- Check out the .git folder for both repos
- Execute
git fetch - Run
git logand see the output... - Okay, now do
git log origin/main - Check which branches were fetched:
git branch -a - Update
mainwith the changes that are onorigin/main
Pull
git pull is a convenient form of what we just did, basically fetches and merges to a branch for you.
Execute it like:
git pull [<remote>] [<branch>]
Not supplying a branch name will use the current branch by default
EXERCISE:
- Add a line at the end of
README.mdin the first repo and commit with the message 'A remote change' - Execute
git pullinremote-git - Why is there an error?
Just because your branches have the same names doesn't mean git will automatically guess that these branches are linked, you have to tell git this information
git branch --set-upstream-to=<remote>/<remotebranch> <localbranch>
Check tracking information with:
git branch -vv
So, Github is just a service that stores repositories for you, a repository you put on github is just a copy of your project folder sitting in a server.
Push
Okay, but what if we want to move our local changes to the remote repository?
git push is the answer.
You can think of this as analogous to pull, and just like pull, if there is no tracking information you have to specify the remote and branch name:
git push <remote> <branch>
EXERCISE:
- checkout the branch
barinremote-git - What can you remark from the output?
- Create a single commit by appending a line to
README.md, give it a message of "CHANGES FROM REMOTE" - Now run
git push - Switch to the first repo and check the logs
Clone
You can think of git clone <URI> as a helper command that lets you:
- Copy the existing repository located in
<URI>into a new directory - Set up remote tracking automatically
- Checks out on the initial branch In one go.
Conflict Resolution
A common problem...
You have local changes (not commited) but you need to pull in changes from the remote first. Normally git does not let you pull unless you have committed all local changes, what do you do?
You can commit then merge/rebase but then you will have a 'broken' commit in your history, which is not ideal.
Stash
git stash lets you store tracked changes into a stack of temporary changes
To stash with a message:
git stash -m "<message>"
List out stashes:
git stash list
Show the changes of the stashes:
git stash show [--index <index>]
Pop a stash (the top stash by default):
git stash pop [--index <index>]
EXERCISE:
- Switch to main branch
- Create a small change in the first repo and commit
- Create a small change in the second repo but don't commit
- Try to pull in, why do you get an error?
- Stash the changes in the second repo
- View the stash list
- Pop your stashed changes
- stash again, but with the message: "my first stash"
- create another change and stash again so we have 2 stashes
- Now, pull in the upstream's changes
- Now get back the first stash changes
Interactive Rebasing & Squashing
A nice way to clean up history is interactive rebase squashing, which is the act of "fusing" two or more commits into a single commit. This is usually done to shorten history.
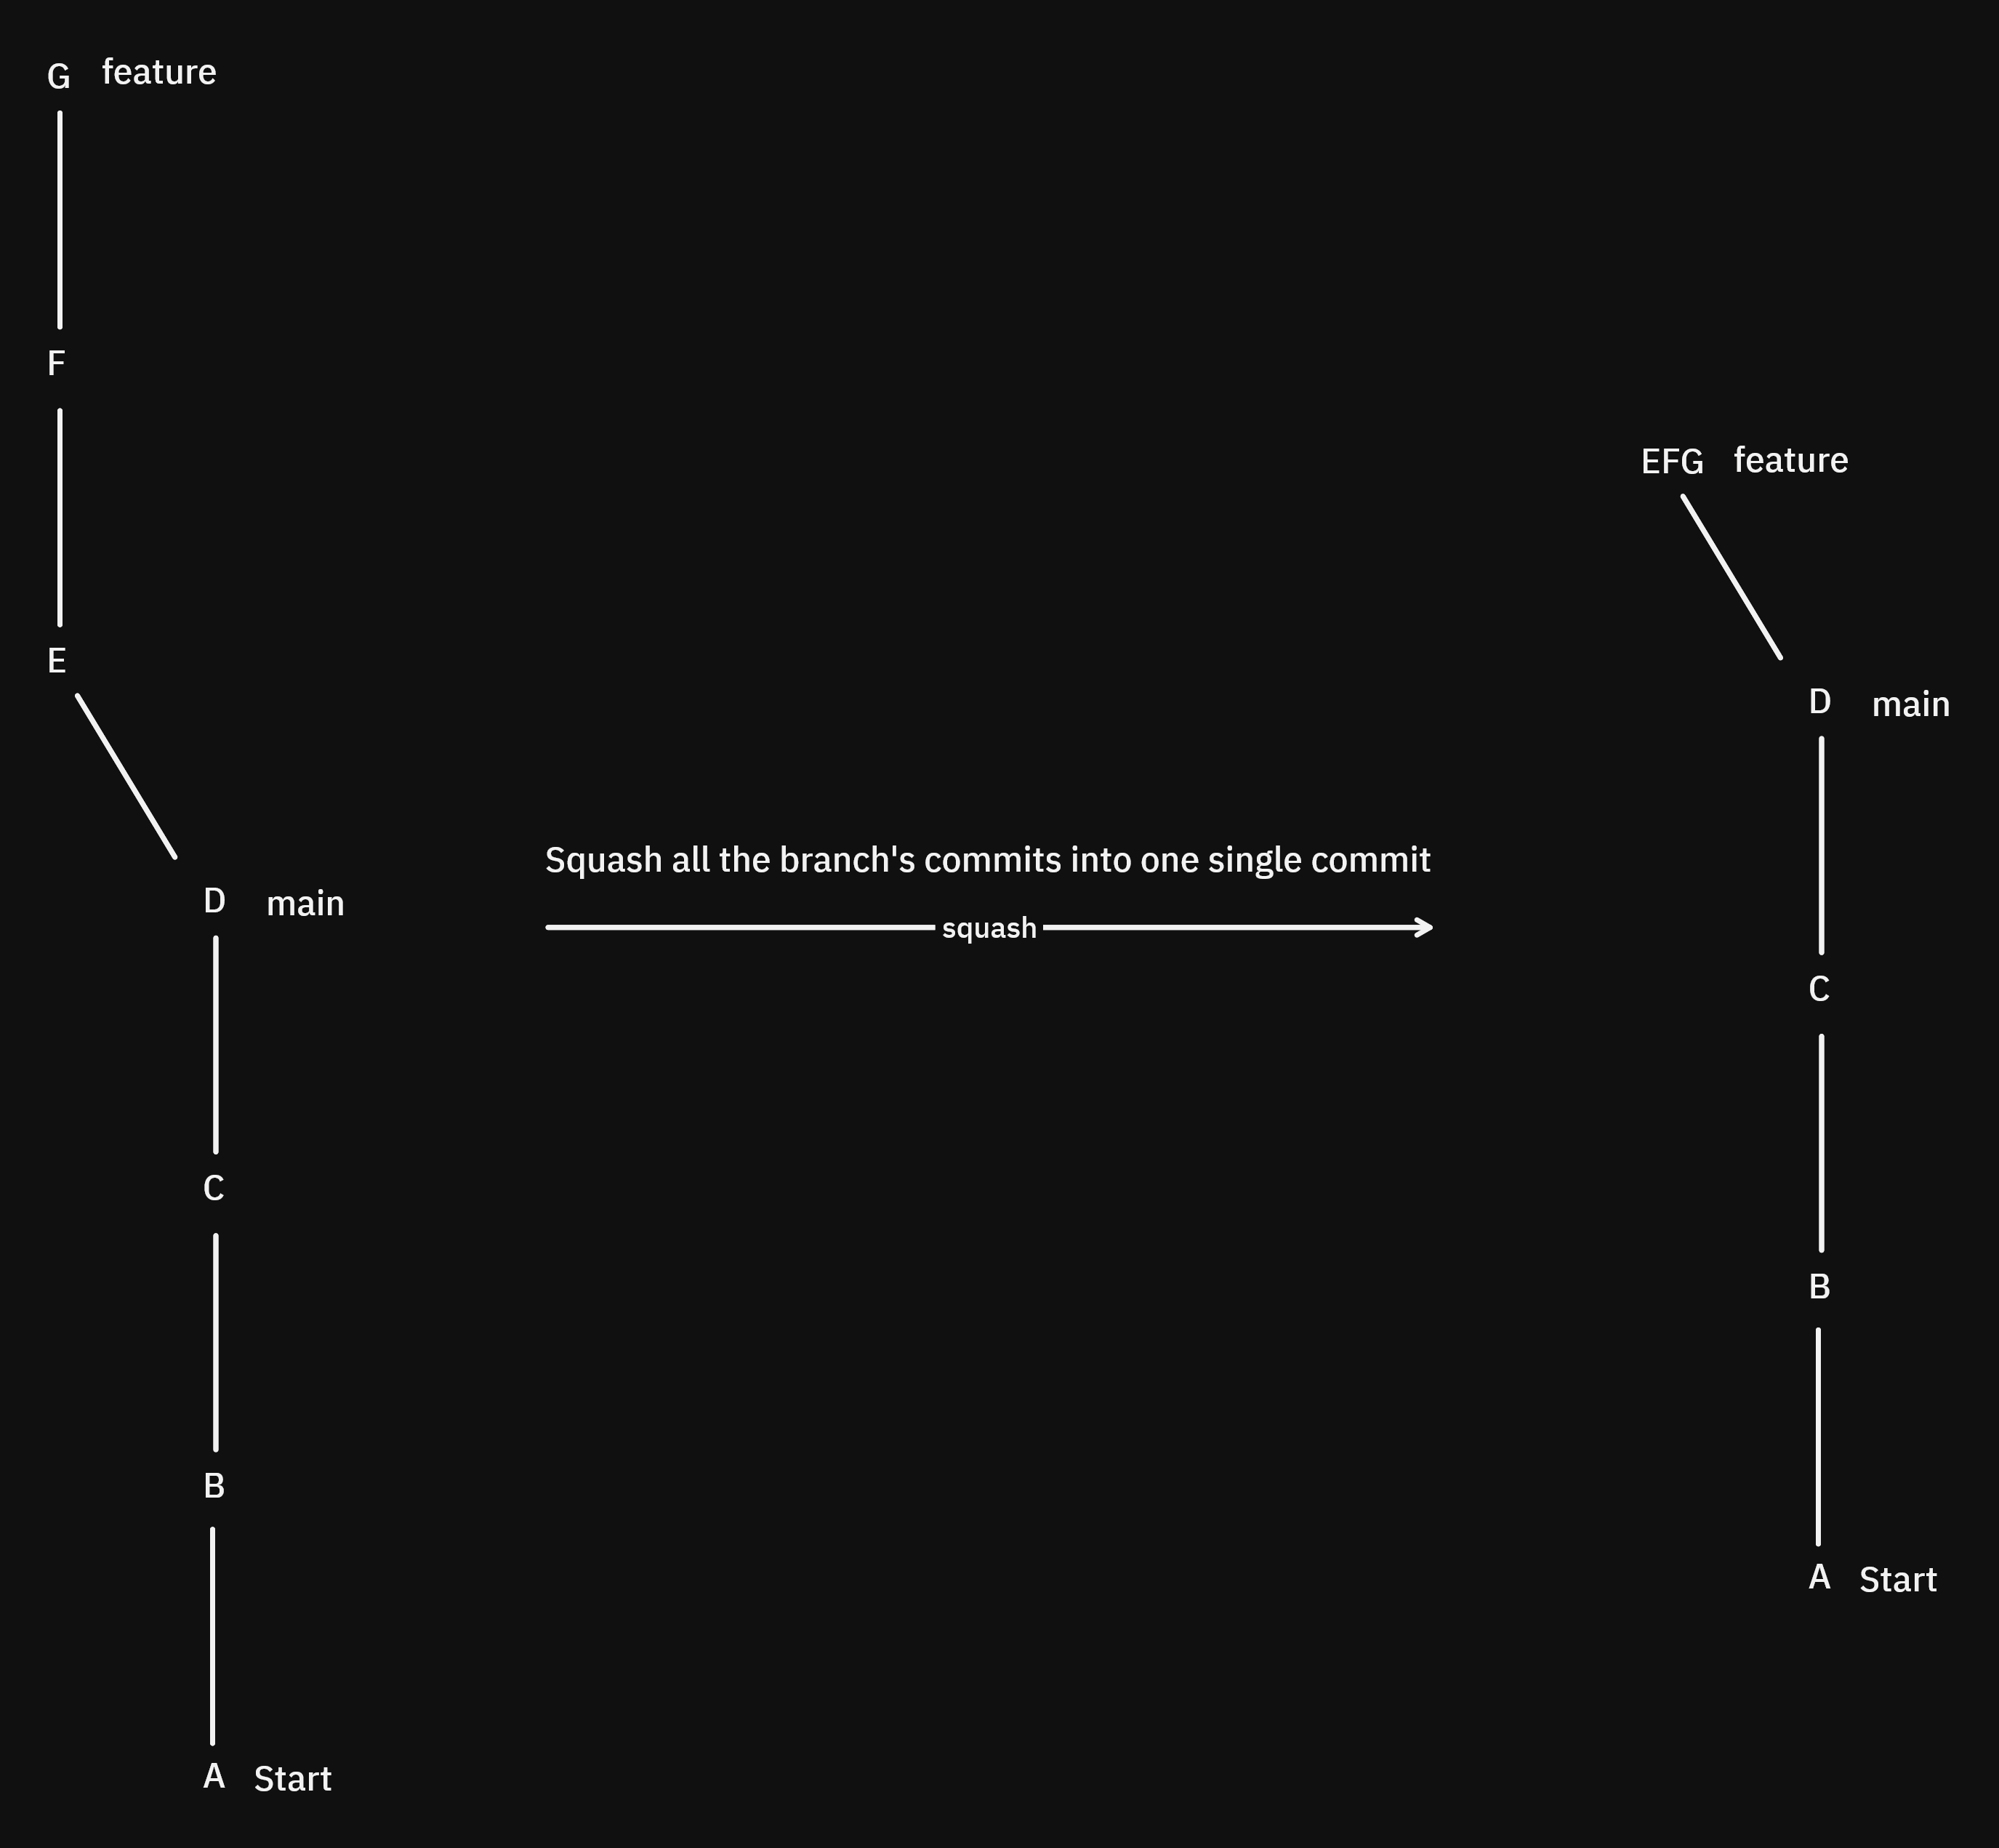
Interactive rebasing also allows you to edit messages and more...
To interactively rebase:
git rebase -i <commit-ish>
a commit-ish is a commit or anything resembling a commit, for example HEAD~n is the nth parent of the current commit.
usually: git rebase -i HEAD~n where n is the number of commits you want to interactively rebase from now. Then an editor shows up asking you what you want to do, for squashing you just change pick with s for every commit except the first one and click save, then choose a message for the resulting commit.
GitHub has a feature where you can choose to merge & squash a pull request (more on this later) and it will do so automatically for you
Conflicts with merge
Nobody likes conflicts, but you have to know how to resolve them.
Conflicts mostly happen when the branches being merged edit the same line of a file, or if one of them edits a file while the other deletes it.
EXERCISE:
- Switch to the main branch for both repos
- Change the first repo's
README.mdfirst line to 'A + 1' and commit - Change the second repo's
README.mdsecond line to 'A + 2' and commit - Pull the changes of the first repo to the second repo to create the conflict
- The error message is not very obvious, run
git statusto see what's causing the conflict - What do you understand from the output?
You can always abort a merge that has a conflict with git merge --abort, same goes with any other command that merges branches like: git rebase --abort, git cherry-pick --abort, etc...
EXERCISE:
- Now look at the contents of
README.md - You can probably notice that getting a merge conflict added some new lines, what do they mean?
- What change would you choose to fix the conflict?
- Okay, now choose the HEAD change, and save the file.
- If you run
git status, nothing has changed, why? - Now add
README.mdto the index - Run
git status, why has the conflict completely disappeared? - Commit with a meaningful message
- Now look at your logs with
git log --graph - Don't push
Before we go any further let's try doing something else before pushing to the first repo
EXERCISE:
- make a small change to bar in the first repo and commit
- Switch to the second repo and pull in the changes
- Why do you get a merge commit? Check the logs:
git log --oneline --graph - What would happen if you continued to commit and pull?
Basically, unless you want two commits for every change, you'd better push after resolving a merge conflict.
Conflicts with rebase
Remember that rebase will move and place all your commits one at a time, which means that conflicts will be different than merge.
For example, consider the following scenario where the commits C and G have a conflict.
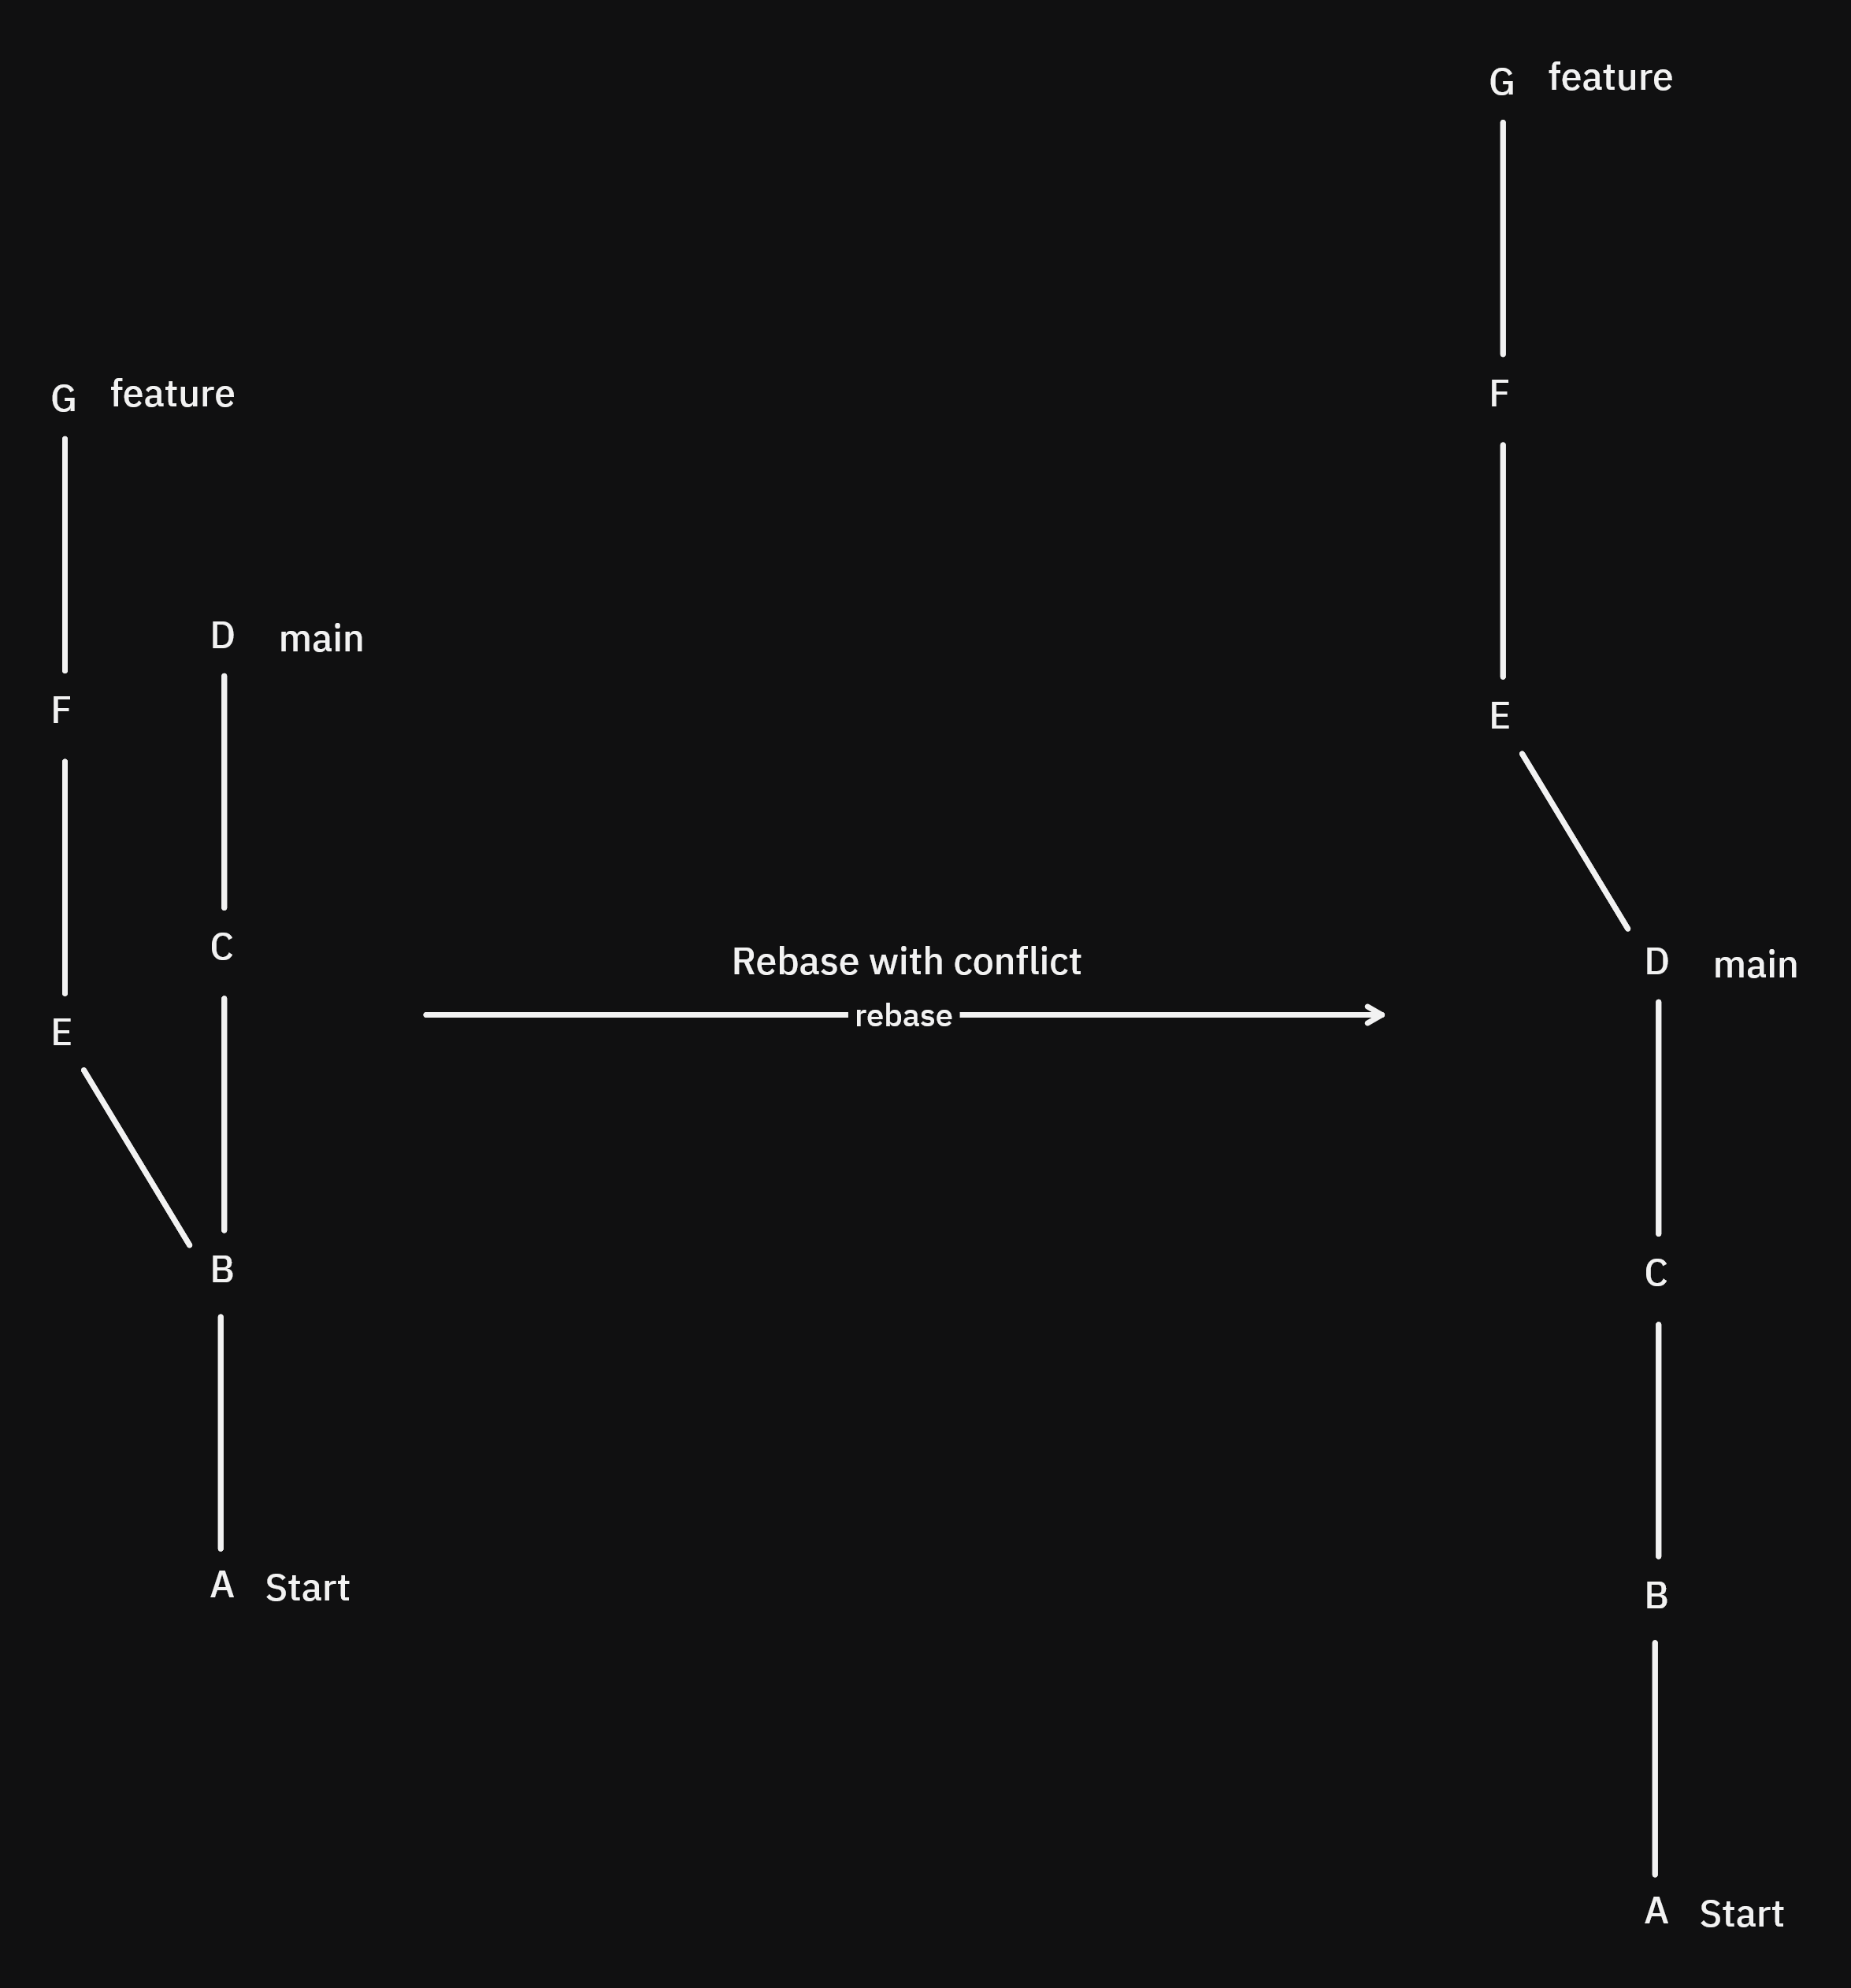
We rebase and we got a conflict and resolve it, neat. But now what if we add a new commit in main: Y-that doesn't have any conflict with E, F, or G-and then rebase again:
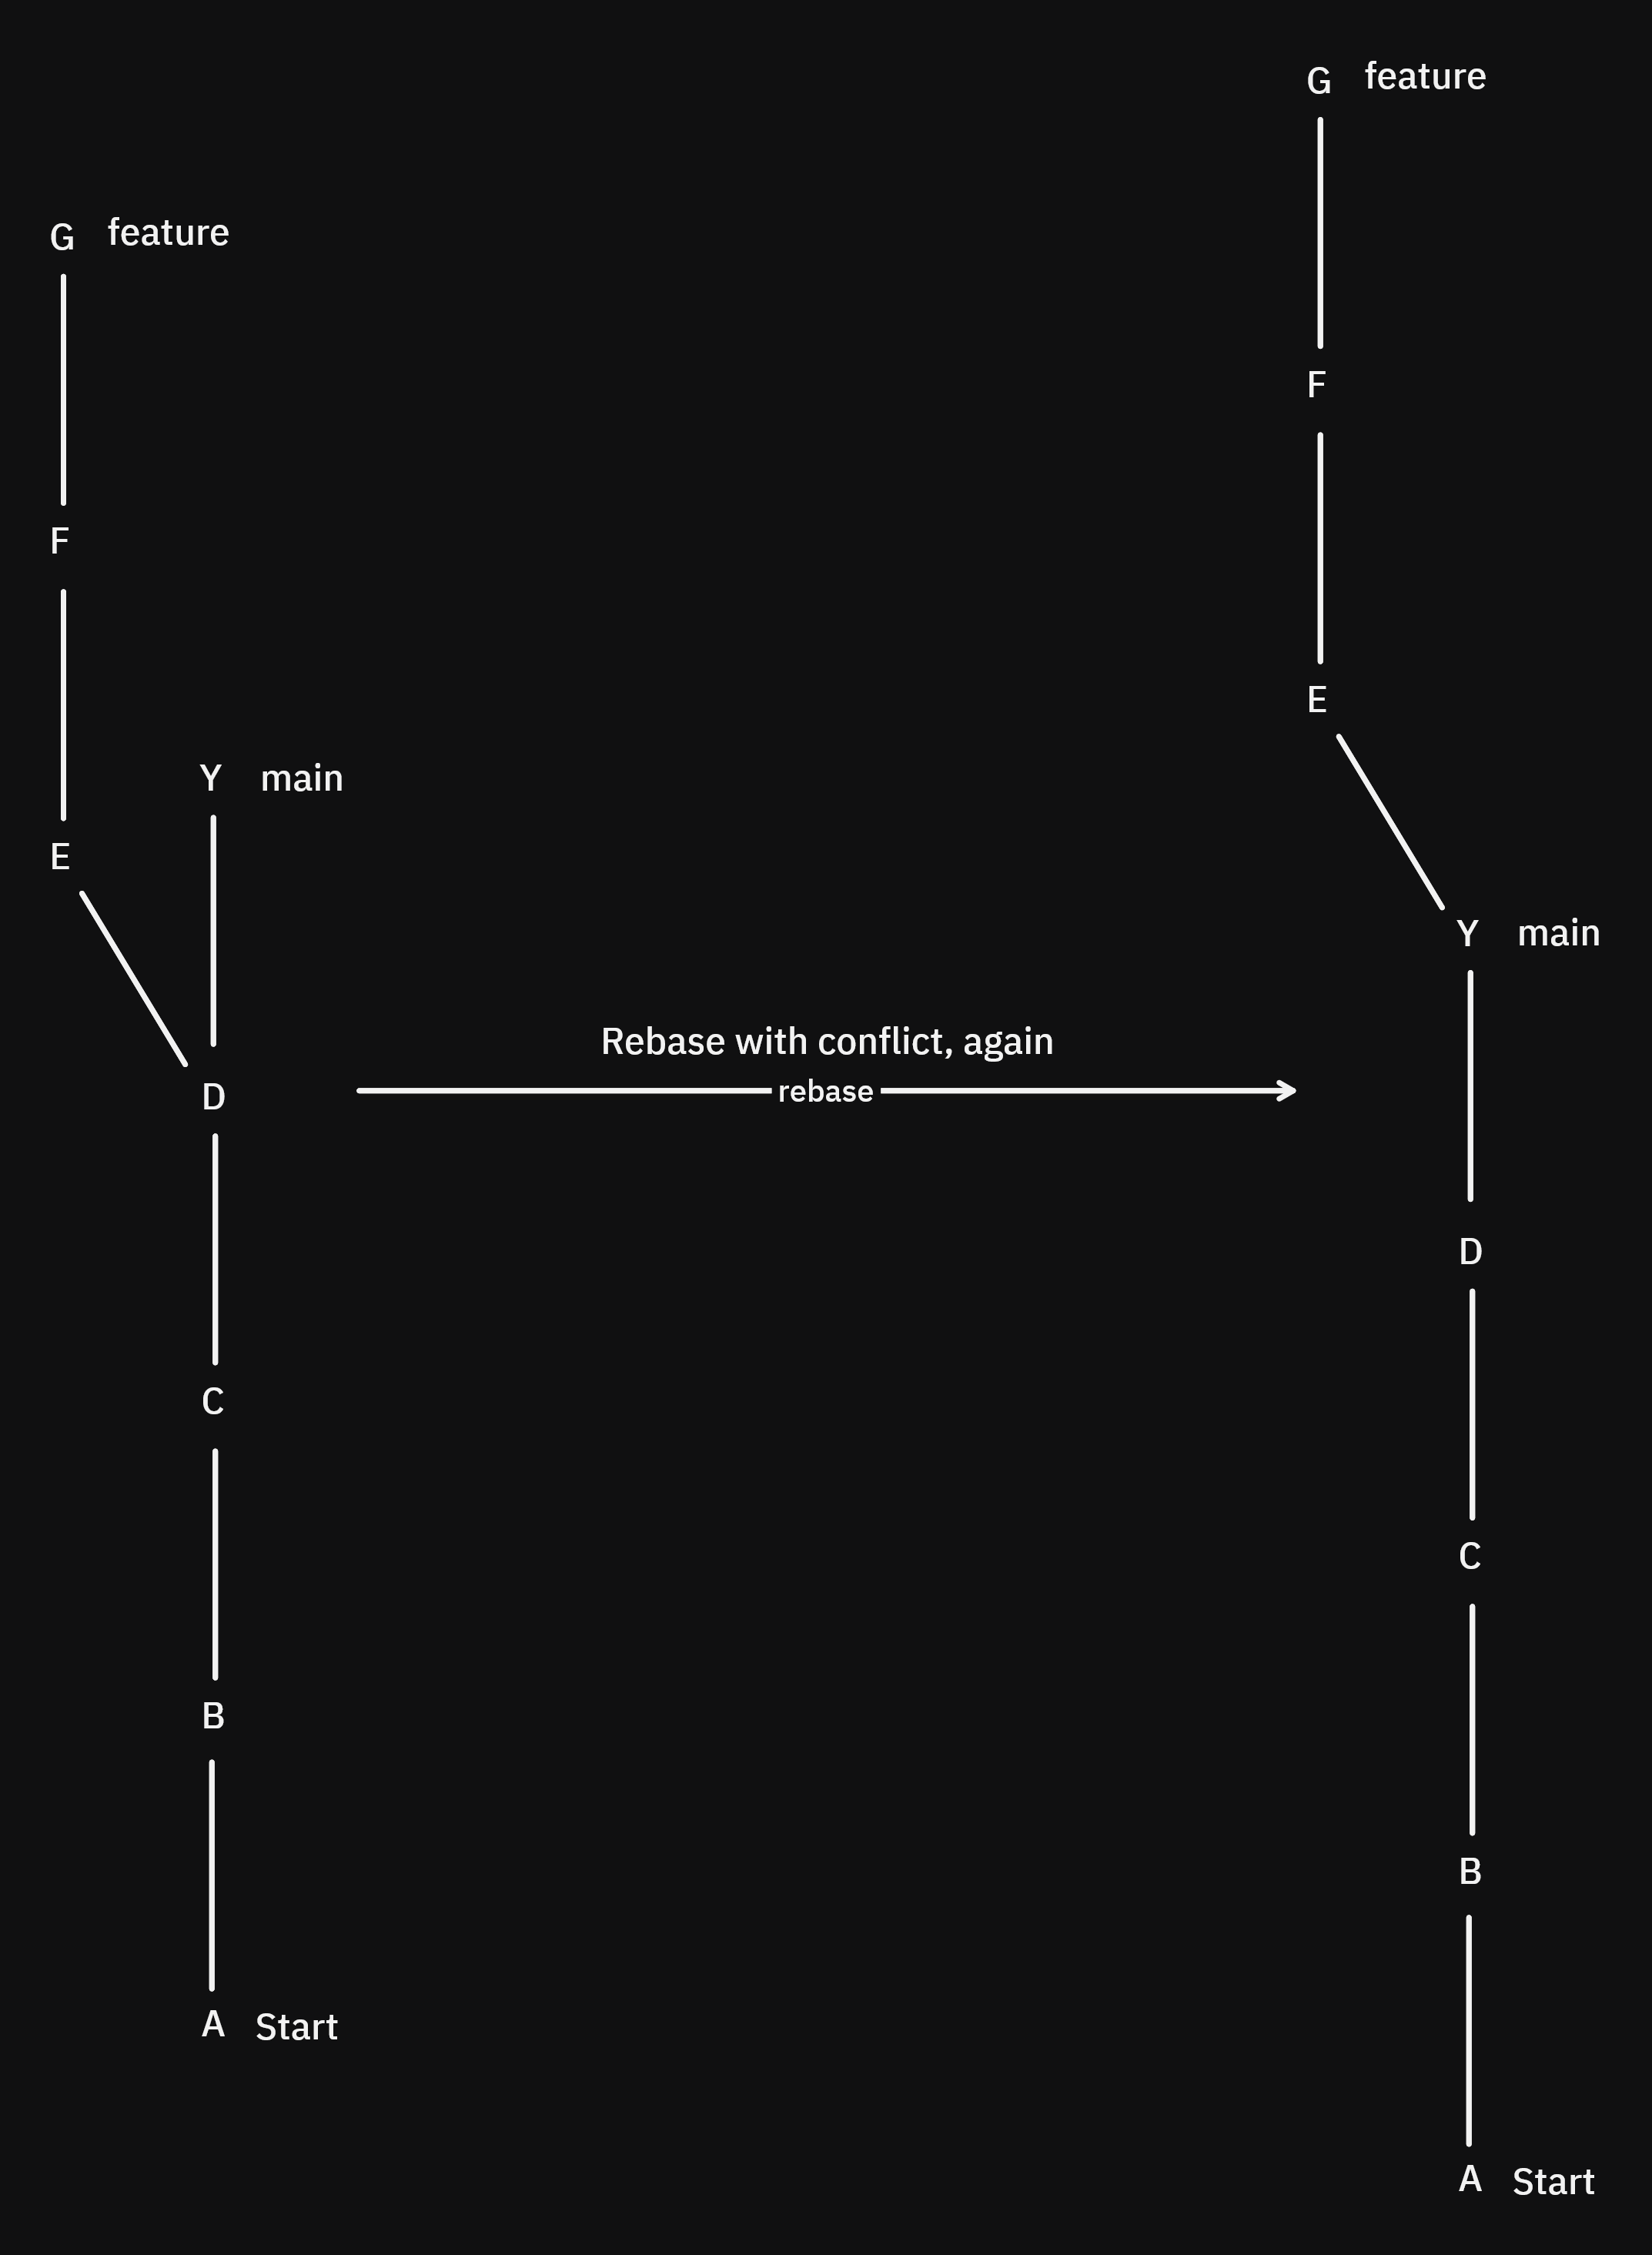
We will have the same conflict between G and C, which is not only annoying but rather confusing.
This comes from the way rebase works, each commit is treated like a patch (the changes that were made between this commit and the one before it).
So, when you resolve a conflict, the rebased commit is changed so that it will contain the new patch, but when you rebase again git doesn't know if that patch is what you want, so it asks you to resolve the conflict again.
There is a way to configure git to tell it to reuse patches, we'll see that later.
EXERCISE:
- Push the changes (on main) from your second remote to your first remote to synchronize them
- Create a change in the first repo: Change the first line of
README.mdto 'A + 3' instead of 'A + 2' - Create another change in the first repo: add a line to the bottom of
bar.md - Commit the changes
- Create a change in the second repo: Change the first line of
README.mdto 'A + 4' instead of 'A + 2' - Create another change in the second repo: add a line to the top of
bar.md - Commit the changes
- rebase the second repo's main branch with the first repo's main branch. To do this, you have to run
git pull --rebase - Why do we have a conflict?
- Okay, now look at the contents of
README.md, pay attention to where HEAD is now, why is it different from merge? - Choose HEAD's change, save, add the file, but DON'T COMMIT
- run
git status, why has the conflict disappeared and not showed up as a change? - now run
git rebase --continue - Check your git logs with
git log --oneline --graph - run
git log -p -1to see the changes done in that commit, notice that anything has changed?
Let's redo this again, but this time, we'll choose the second repository's change
EXERCISE:
- 'A + 5' in the first repo
- 'A + 6' in the second repo
git pull --rebase- Solve the conflict (choose 'A + 6') and
git rebase --continue - Do a quick
git log --oneline - Now add a new line 'NEWLINE' below 'A + 6' in the second repo
git pull --rebase- Oops, we have a conflict... why?
RERERE
There is a solution to this infinite conflict problem with rebase and it's called RERERE (Reuse Recorded Resolution) which will save the changes you made in previous rebases and replay them in any new rebase. If you want to go into more details, look at the manual: man git-rerere or, take a look at the git docs
You can enable rerere by changing your config:
git config --add rerere.enabled true
This is not enabled by default, as it can resolve conflicts in a way that you don't want anymore, you can disable in that case.
Ours & Theirs
When a conflict is created you will get conflicting changes from two branches. Sometimes you just want to choose a single branch's version of the project and discard the other.
To do this you can use
git checkout --oursto get the version of the branch currently pointed to by HEADgit checkout --theirsto get the version of the other branch
This means that:
- if you were merging, 'ours' would be the branch you are merging, typically
featureif you are merging feature onto main. - if you were rebasing, 'ours' would be the branch you are rebasing on, typically
mainif you are rebasing feature onto main.
If this is confusing for you, don't be alarmed. I always confuse these.
Advanced Techniques
A problem you might face in a large project is tracking down a change that occurred in the past and is causing a bug.
You might not really know what exactly is causing the bug but you have a test that will tell you if the bug exists or doesn't.
In real-world scenarios, running tests will be very slow. And you will have a very large number of commits to search... What would you do?
Searching through the logs
If you know that the bug is inside a certain module / function / folder..., but don't know the exact change that is causing it, you can try searching the logs:
Here are some helpful flags you can use with git log:
-
--grep=<pattern>will show a list of all commits whose comments follow<pattern> -
-pwill show the changes of each commit -
-S "<string>"will show a list of all commits whose changes contain the string<string> -
-- file file2...to search only these files
Bisect
When searching through the logs fail, you will simply have to look through the entire history of the repo to find the commit where the problem started.
Bisect is basically a binary search, since commits are ordered by time we can perform a binary search by taking two commits, one we know has the bug in the present, and one we know does not have the bug in the past.
To perform a bisect, you need to be able to tell if the bug is present in a commit easily, or if you want to be extra fast, write a test for it.
let's say our last commit is B, it has the bug
we go back 500 commits to commit A, and it doesn't have the bug, so something like the following:
A-----------------------------B
now if we go straight to the middle between these two commits to commit C and test it...
A----unknown----C----unknown----B
If our test comes back positive, as in C has the bug, what can we say about all commits between C and B?
A----unknown----C-------bad-----B
Since C is bad, everything after C is also bad. but if C is good, then everything before C is good.
A-----good------C----unknown----B
Then, we repeat with the unknown parts until we have one commit left, which is the first bad commit.
This is way way faster than a linear search because it halves the amount of commits it has to search on every iteration. This means that if we had 500 commits, it would take only ceil(log2(500)) = 9 tests to find the bad commit.
It is also especially useful when the "bug" you're looking for is related to performance, i.e code being slow/fast. If a program now has a performance downgrade that you just don't know the source of, you can bisect to find out.
To bisect manually:
- run
git bisect start - then
git bisect badto mark the current commit as 'bad' - then
git bisect good <commit-ish>to mark the corresponding commit as 'good' - You will then start a bisect, on each step, you have to manually mark the current commit as 'good' or 'bad' (with
git bisect (start|bad)) until you find the first bad commit.
To bisect automatically:
git bisect run <command>with<command>being the command that will be run on each step, if the command returns0it is good; if it returns1, it is bad.
Restore
git restore is used to undo uncommitted changes or to unstage changes:
- Permanently discard uncommitted modifications:
git restore (<filename>|<directory>) - Unstage specific files (undo git add):
git restore --staged <filename>
Revert
Instead of undoing changes, git revert <commit-ish> will basically create a new commit with the opposite change of a commit.
Say, if we had a commit that added a new line on line 3 of a file, reverting that commit will be the same as deleting that line.
EXERCISE:
- Check the changes of the commit with message 'E' (
git log --grep E -p) - Revert the commit
- If you get a conflict, that's very normal. Solve the confilct and run
git revert --continue - Check the logs to see what chaned
Reset
This is similar to git restore but it works differently:
There are two types:
git reset --soft [<commit-ish>]will undo all commits after<commit-ish>and restore those changes to the staging areagit reset --hard [<commit-ish>] will undo all commits after<commit-ish>and discard the changes in the staging area permanently- Not supplying
<commit-ish>will reset to the current commit
EXERCISE:
- Reset the 'revert E' commit with
--soft - Run
git status - Commit the changes again
- Reset the 'revert E' commit with
--hard - Run
git status - What do you notice?
.gitignore
A lot of times, we want to keep some files permanently untracked, even if you tried to git add them it shouldn't work:
- Environment variable files (.env) that contain private API keys for example, or personal configurations
- Build directories that take up a lot of storage space and are unnecessary to share
- Dependency directories that take up a lot of storage space
The way git handles this issue is that if you create a file named .gitignore and git will automatically ignore any files whose paths matches those in this special file.
EXERCISE:
- Create a new file and call it
.gitignore - Add a new line to it: '.env'
- Create another file and call it
.env - Add a line in .env:
FOO=BAR - Run
git status - What do you remark?
GitHub & Project Management
GitHub Fundamentals
GitHub is a web-based platform built around Git that transforms version control into a collaborative, social experience. While Git handles the technical aspects of tracking code changes, GitHub adds a powerful layer of tools for teams to work together, review code, manage projects, and share their work with the world.
You can explore public repositories-see the files, commit history and issues-and even help out on open-source projects.
EXERCISE:
- Check out this GitHub repo
- Take a look around, see the commit history, collaborators...etc
Remote Repository Management
GitHub is primarily a Remote Repository Hosting Service, instead of buying your own server to put your remote repositories in to share with your team, you can put them on GitHub for free.
EXERCISE
- Create a new public repository in your github account
- Connect it with your local repository (the first one)
- What do you notice about the README.md file?
Collaboration Features
The best thing about GitHub is that it eases effective collaboration on projects.
Since the main branch is pretty sensitive, it is usually where production code resides; we want any change to this branch to go through thorough inspection. This is primarily done with pull requests
Usually, a project is split up into specific features that need to be implemented, when a developer wants to start work on a new feature, he will create a specific branch for that feature, after he is finished he will create a pull request to merge to main.
A pull request is a request to merge changes from a branch to another branch, when a pull request is opened, a conversation is started around the request; requestors can request reviews, project admins can request necessary changes then, close or merge the pull request.
Even with smaller teams, pull requests are encouraged due to the fact that they require more than one person to review the code, making bugs highly unlikely to pass through.
EXERCISE:
- Create a new branch for a new feature in our local repo
- Code the new feature
- Publish the changes
- Go to GitHub and open a new pull request to merge your feature branch onto
main - Request a review from
copilot(if you have GitHub Pro) - Merge the request
Issues and Project Management
GitHub Issues are basically a task tracking app inside GitHub.
It's a great way for managing your project, as you can label issues, assign issues to project collaborators, assign deadlines to issues, create corresponding branches, assign dependencies between issues, and even make a timeline / kanban board in GitHub Projects. All in one place.
EXERCISE:
- Create a milestone for your project
- Create a new issue in your repository
- Assing this issue to the milestone you just created
- Give it a description
- Give it a deadline
- Label it as a feature
- Assign it to
copilot - Review
copilot's merge request - Check out
copilot's code by checking out its branch - Merge the pull request
Teach GitHub Issues as a tracking system—bug reports, feature requests, and tasks. Cover labels, milestones, and assignments. Introduce GitHub Projects for kanban-style boards and organizing work. Show how issues create a paper trail for decisions.
Commit Message Best Practices
Commit messages should have a certain structure in your projects so that collaborators can tell what changes were made and why just by looking at the message:
Here's a convention used by many:
<type>: <description>

[optional body]

[optional footer]
<type>: the type of the commit:
- fix: a bug fix
- feature: a new feature
- test: a new test
- ...etc
<description>: a description of the changes made in the commit and why
optional body: an optional message body if needed
optional footer: Extra information that isn't about the changes in the commit: the authors and the reviewers of the commit, any breaking changes the commit might cause...etc
Examples:
feat: allow provided config object to extend other configs

BREAKING CHANGE: `extends` key in config file is now used for extending other config files
fix: prevent racing of requests

Introduce a request id and a reference to latest request. Dismiss
incoming responses other than from latest request.

Remove timeouts which were used to mitigate the racing issue but are
obsolete now.

Reviewed-by: Z
Refs: #123
References
The Primeagen's course notes on Git
Nick Farina - Git is Simpler Than You Think
Oh Shit, Git!? - this one's funny but useful
Conventional Commits - Best practices for commits